
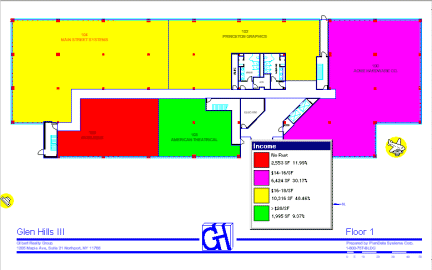
Color Code Plan allows you to view a color-coded floor plan which can be very helpful when trying to get a handle on all the data associated with a space. You may color-code any of the data that resides on the database of your floor plans. For example, you can color code for Area Types, Available Space, Income, Lease Expiration, and Options based on data that has already been entered into the database. On retail properties, this list is usually much more extensive and includes sales performance data, etc.
Each type is assigned a range by default. The default settings may be changed for a realistic allocation that your company uses.
To produce a color-coded floor plan:
Spaces on the floor plan must be assigned before using this feature. See Assigning New Space.
Select Graphics > Color-Code Plan or click on the Tricolored ![]() PlanData logo icon.
PlanData logo icon.
Select a category type, then click on the Ok button.
The drawing will color code and a legend will be created on the right hand side of the screen.
To print the color-coded floor plan:
Keep in mind that a color-coded floor plan only prints in default view, not a selected window.
1. Select File > Print or click on the print icon.
2. Send the drawing to the printer.
3. Click on the Print icon ![]() .
.
See: Print Preview, Print Colors.
Select the Clear Color-Code icon to return to command mode and remove color-coding.
See also: Setting Up Color Codes