Space Assignments are used not only to display information within spaces but they are the vehicle that SpaceMan uses to "connect" data to the spaces. In most cases, SpaceMan reads information imported from your "Property Management Accounting System." The link between this data and SpaceMan can be based on either the Room Number or Lease ID. See Introduction to Working with Area Assignments
In order for SpaceMan to be able to tie information to a space, the space must be given an assignment. Before we begin this, however, we should discuss how data could affect the process of assigning space.
SpaceMan usually recognizes the data assigned to a space using the combination of Building, Floor, and Room codes assigned to a particular space. The Building and Floor code fields are automatically filled in when the data regarding a space is initially entered into SpaceMan. It is up to the user to enter the Room code. If you choose, although it is not recommended, you can enter the Lease ID and use it for the space assignment, rather than the Room.
You should note that, in the example of using a Lease ID, you can only view the data - not edit it.
Another important aspect of space assignment is to know what types of space that you're going to be assigning. For our purposes, we'll be adding a space assignment for a tenant space but this can also be done to non-tenant spaces for the purpose of calculating the rentable square footage of a floor and/or building.
Adding a Space Assignment:
To add a Space Assignment you must first sub-divide a space.
1. Click on the ![]() Assign Space icon, or select Assignment > Add Assignment from the main menu. Note that your cursor changes to the hand and pencil icon
Assign Space icon, or select Assignment > Add Assignment from the main menu. Note that your cursor changes to the hand and pencil icon
2. Click within the space that you want to add an assignment.
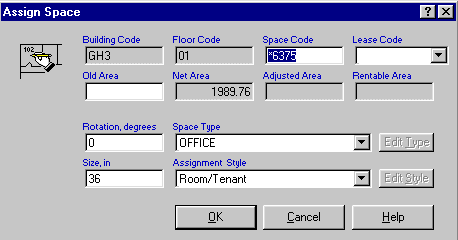
The Assign Space dialogue box will appear. Note that the Building Code and Floor Code Fields are already filled in based on the building and floor that you are working with.
Note: Old Area is sometimes used to store the previous rentable area of the particular space.

3. Type in a new Space Code. The system generated number should be used for non-rentable spaces such as stairs and utility closets. If working with a rentable space you must replace the system generated number with the proper room number.
Note: The Space Code is the most important piece of information that is tied to the database. You must know what the room number is going to be. Space Code is the best method of keeping track of the information, not Lease Code. Although PlanData does not recommend using Lease Code, it is possible to use it, just more complicated.
4. If working with a lease code based system, select the Lease Code from the drop-down.
5. Select a Space Type from the drop-down list. In this example, select OFFICE.
6. Select an Assignment Style from the drop-down list. This will vary from project to project.
7. Rotation will allow you to change the orientation of the text. Type the degrees you wish the text rotated.
8. Type a Font size in the Size, in text box provided.
9. Click OK. The Edit dialogue box will close, returning you to the Assigned space. The new space assignment will appear in the new room.
The Edit Type Button and The Edit Style Button become active when you are working in the Edit All
Assignments dialogue box, which is the same as the Assign Space dialogue box. The Edit All box appears
when data has previously been assigned to the space that you are working with.
Edit Type allows you to add/edit new space types.
Edit Style brings up the Assignment Styles box, which allows you to add/edit the label styles.
See Create a Customized Space Assignment for more information.